Watercolor Landscape of Big Sky Farmlands No. 2
Dramatic clouds across a blue sky are the inspiration for the watercolor landscape I'm sharing today. Last week, I shared the first painting Big Sky Farmlands No. 1 where I showed the progression of that painting. The fantastic effects of sky play against the wide spreading fields. This is the photo that I sketch from to begin this process.
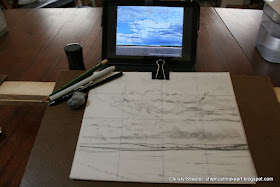
I sketch on tracing paper so that the watercolor paper is not marred up with multiple pencil lines and eraser marks. The mistakes are corrected on tracing paper. I use a piece of acetate with a white 4 x 4 grid; it's taped to the front of the tablet screen. A grid of 4 x 4 squares is drawn onto a sheet of tracing paper. The grid on tracing paper is laid as the second layer below my sketch. The bottom layer is a piece of white card stock which makes it all bright white in appearance.
As I sketch, I use more shading than will appear on the watercolor paper. This sketch is my guide, giving direction in values for the final work. I'm able to work out my design for the main parts of the composition here.
The drawing is transferred to watercolor paper using a sheet of graphite paper. I do not transfer the shading, just the outline. Using a harder graphite pencil like 2H means the sketch is more effectively transferred to the watercolor paper.
This view is hard to see but I'm showing how faint the drawing appears on the watercolor paper. I want the pencils lines to fade into the watercolor painting. They'll be barely visible when it's complete.
At times, it is necessary to turn everything upside down. This makes the shapes more abstract and my eye has to study the areas carefully, taking more time to really see what's there.
Before painting the sky, I applied scotch tape to the length from left to right, the area where land meets sky. With a box knife, I carefully scored the tape along the top pencil line of the horizon line. The tape that overlapped sky is removed. This saves the land from blue paint. It also makes my sky painting process go faster. Without worry of pigment spreading too far, I can work quickly.
A wider view of the work area shows there's plenty of mess going on at this point. Multiple palettes and mixing cups keep it on the edge of confusing. I just love it!
The sky has taken on a variety of hues now. The land has color applied in soft washes. I'm building the color one layer and then another.
Here the two paintings hang together off to the side. They rest on the easel while another painting is being worked at the table. Looking at them throughout the day is a great way to see them in a fresh way. I find problem areas that might not have been clear before. I see what's working well and areas I'd like to work next.
A snapshot of progress in the foreground. Golds along with burnt sienna and burnt umber suggest the dark soil and stubble. Wet washes and palette knife scraping build more texture.
The buildings are defined along with most distant fields; the areas lit by the sun are lightest in value. In the foreground, scrubbing and lifting creates the impression of standing water in the field. Darker brown lines suggest wheel tracks leading across the field. Palette knife painting and scraping gives the stubble more texture in the far left foreground. This painting is the final one in a series of five landscape watercolor paintings completed this fall.
This finished landscape painting, Big Sky Farmlands No. 2, will soon be available in the Etsy Shop, ChristySheelerArtist. It is offered with ivory double mat; the frame is not included. I will offer a link here when it has been listed.
My first set of prints arrived. It appears my monitor may need some tune-up to accurately depict what the prints will look like. The prints are much darker and have less contrast than I expected. My next step is to learn how to calibrate my monitor.
Until next Thursday,
-Christy
because she must make art.
P.S. Thankfully, this post was written a week earlier than posted. I've had an unfortunate accident involving an exercise ball. I took a short but hard fall onto laminate flooring. My low back is recovering and I'm taking great care to let it heal. I'm working on some sketches for upcoming projects in the meantime. I may be taking a break from longer posts until January. I'm so pleased with keeping up on weekly posts for such a long period of time. I'd like to continue posting on Thursdays, even if they are brief updates.


No comments:
Post a Comment