Pages

Thursday, December 17, 2015

What You See Is Not Always What You Get: Art Prints

so i might want to make prints...


I've been back and forth on whether to have art prints made for quite some time.  It's not an easy decision for me to make with my own artwork.  I read an article online, (it's a thread on Wet Canvas) How to Produce (and Sell) Prints of Your Artwork, by David B. Sullivan.  Click on the previous sentence and you can read through it yourself...if you are another artist trying to think through your options as well.  

After reading what David B. Sullivan has to say on the subject, I found myself more at peace with the options of ordering art prints of my work.  This led me to do more research on my options.  Most options are very hard to afford.  FinerWorks is the company I decided to try out in order to get a start in the process.  I spent quite a bit of time learning about photographing my artwork.  There are quite a lot of skills to be learned without a large sum of money backing these ventures!  Learning this process was very good for me by the end of it.

My photos looked great!  I uploaded to the FinerWorks website and made my order of prints.  When the order arrived, I wasn't completely surprised at my disappointment.  The prints were much darker and muted than the originals.  I felt this could happen after reading through the faqs on the website.  The finest details were there but the contrast is very much off.  


I went over them with a trusted advisor, my husband; he was so encouraging and supportive even though we'd just put money into this print order.  On the FinerWorks website, I had read about artists needing to calibrate the monitor for better results.  The company offers a couple of options for adjusting for better prints.  The most inexpensive option is $3.95 for a calibration print on a specific type of paper/surface.  The website offers complete instructions for how this works.  For $19.95, the other option is the Starter Kit, including samples of all their papers and a $20.00 gift card.  That's the option I chose; it's hard to choose paper types without a sample.

Tuesday, December 15, 2015

Christmas Tea: Part 3

place card tags for a Christmas tea


Place cards are such a special touch and a few details can make them beautiful.  It takes a little bit of experimentation to come up with a design.  Brown kraft paper tags were my beginning of my idea.  I had the brown twine and the metallic washi tape.  I found the leaves rubber stamp set at a local craft shop, Creative Addictions.  The set is Fossil Leaves by Inkadinkadoo.  If you don't have a craft store near, Amazon sells them for less than $5.00.  The espresso ink pad used is by ColorBox.  I had been given a package of smaller white paper doilies and I wanted to incorporate them in some way.

My Pinterest board for many of the ideas and products I used can be found HERE.

In keeping with the simplistic design, I opted for clear plastic silverware from the dollar store.  At the Christmas Tea, platters of appetizers and desserts (in small portions) are served at each table; plastic silverware would make clean up so much easier.  I've got a silver/gray tablecloth and napkins from last year.  My napkin folded design would be a small rectangle shape with a pocket.  These place cards would be tied around the napkin.


In Publisher software, I created a table 4 columns by 2 rows.  By stretching this table to fit the paper, I adjusted to the size I wanted for my tags.  I edited the table format to have a dotted line outline for easier cutting on the paper cutter.  The names were typed in Landsdowne font, size 55 with placement at the lower portion of the rectangle shaped cell.


I printed a rough draft on plain white copy paper to check the size of the tags.  When I was pleased with the size and design, I printed it on brown card stock.  The tags were cut apart on the paper cutter.  I played with a blank tag to get the angles right; that tag served as a guide to trim the other tags.  With scissors, I clipped the top corners of the tags.  The square blue punch shown is a handy tool to have!  Slip the tag in, press down and the corners are now rounded.


I don't have step by step photos of the process.  I first stamped the tag with the leaves in espresso.  Next, I added the washi tape to the bottom edge.  White paper doilies were trimmed on the paper cutter to create a lacy edge.  I glued it on with a cheap craft brush and tacky glue.  A hole punch finished off the tag.  The brown twine was added and later tied around the napkin.

Friday, December 11, 2015

Christmas Tea: Part 2

Tall glass vase with vellum wrap


In part 1, I described the beginning of the table centerpiece.  Today, I'd like to show you how I created the tall glass vase with scripture on vellum.  The vellum wrap is inexpensive and easy to make.


The tall vase looks like frosted glass with painted lettering but it's a very simple project:  With Publisher software, a piece of vellum and a printer, a vase has inspiration to share.  I'll quickly lead you through the steps I took to complete it.


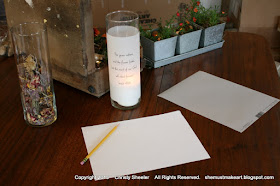
First, a template was needed to know where to print the lettering.  I used a piece of plain white copy paper and a pencil.  Once I had wrapped and taped it to the vase, I loosely sketched how much space I wanted the verse to fill.


With a ruler, I measured and marked the measurements from the left and top edges.  Taking this to the computer, the guides in Publisher help me match up where the text should fit.


Here's a screen view of how it appears as I work out the font type and size.  I chose Landsdowne, size 36, for the text.  I tried fonts with flourishes but found them harder to read at a glance.


Next, I printed off a sample on the another sheet of plain white copy paper.  This step saves me from wasting a sheet of vellum.  I take this and wrap it around the vase, making sure no further changes are necessary.  The rough draft on copy paper looks great; I'm ready to send the vellum through the printer.


In the photo below, I show the plain paper copy on bottom left and the vellum copy on bottom right.  At top right, the plain white vellum (frosted finish) with its item information on the left edge.  That edge needs to be trimmed off so that it will be 8 1/2" x 11" for the printer.  Don't skip this step!  The sheet of vellum needs to be the standard 8 1/2" x 11" when it's fed through the printer.


The paper cutter makes quick work of neatly removing that edge.  Now the vellum can be placed in the inkjet printer.


I remove all other paper from the tray to avoid more than one sheet feeding through at a time.  After printing on the vellum, I leave it to dry thoroughly because it could smudge easily.  I would suggest waiting 20-30 minutes before handling the vellum.  I haven't tried printing a photo on vellum but I think it's possible.

Rubber stamps could be used to add decorative detail.  I recommend using Stazon ink.  Information from the package label: a fast-drying solvent ink, made for use on plastic, metal, glass, ceramic, laminated paper, and leather.  You'll need a special cleaner to remove the Stazon ink from the rubber stamp.


I use two pieces of tape to secure it to the vase.  The vellum had a bit of overlap but I left it alone.  It could be trimmed.  Add a candle and it's done!


To my great amazement, I have more to share!  I hope you're enjoying these tips.  I had no idea this would turn into a three part series!  Next time, the brief how-to for these place cards with rubber stamps, decorative washi tape, paper doilies, and brown twine.  You don't have to wait until next Thursday...because it's all prepared and ready to go!  I'll have it here in the next day or two.

Thanks for following along and I'll chat with you again very soon!

-Christy

because she must make art.


Thursday, December 10, 2015

Christmas Tea Party

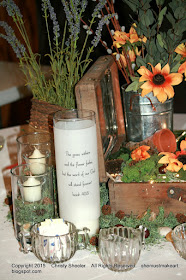
A rustic box, flowers and a string of lights


The past three weeks have been a whirlwind of activity!  While the art studio has been put to great use, there haven't been any paintings in progress.  The watercolor palettes are tucked away in the refrigerator for a while longer.  My parents spent two and a half weeks with us; what an incredible joy to have them here for my birthday, Thanksgiving and a special Christmas Tea.  If you haven't read previous posts, my exercise ball and I had a misunderstanding.  After a fall to the floor, my pelvis and tailbone needed some recovery time.  My parents arrived just when I needed them most, making it possible for me to keep up with several commitments.  They kept this house busy with activity, cleaning, repairing, organizing and decorating.  I just can't thank them enough!


Last time, I shared the making of seed packets to share with my table guests at the annual Christmas Tea at our church.  I've been planning my table decor since September but had to make some adjustments to those plans.  Simplicity and ease were now more important than ever.  Thankfully, most of the hard work was behind me.  I just needed to set up what I had envisioned in my head; whether it would look like I imagined, I needed to see for sure.


"The grass withers and the flower fades 

but the word of our God will stand forever!"


Isaiah 40:8


That was my inspiration for this table decor.  As I mulled over what to share this week, I thought that it might be fun to share the process of putting all the separate elements together.  Hopefully, you'll find this fun and interesting.  I believe home decor IS art.  My sister claims she doesn't have the same talent I have but I disagree.  Her home is just lovely and her ideas are fantastic.  I draw so much from what she does with every room of her home.  She doesn't know how much I quietly observe and gather ideas from her.


Thursday, December 3, 2015

Preparing for a Christmas Tea

Tea Time is Lovely

A quick update on my recent activities... It was hard to let Thanksgiving Day pass without an update but I reasoned that everyone else is busy, too.  We have enjoyed my parents being here although our Montana weather challenges them to keep warm enough.  My back continues to heal a bit each day.  I struggle to keep my expectations in check to prevent slowing the recovery.  Just a week ago, I hated using the stairs for the pain involved.  Now that's not a problem.  Just some soreness remains and I'm so relieved to be headed back toward my usual routine.

I've made it further toward ordering fine art prints of my work.  After calibrating my monitor with the method recommended by Finer Works, I see that my photos have been darker in contrast than desired.  I'll need to take some time to be sure the photos I upload are corrected first.  I'm looking forward to making an order of fine art giclee prints.  It's exciting to reach more goals although the process takes more time than one would expect.  

I'm in full-on Christmas holiday decorating and preparation mode.  No shopping done yet though.  That's minor in my opinion.  Our church is preparing for the annual Christmas Tea, now just days away.  Below is a photo of my table last year.  It's such a wonderful way to begin the Christmas season with meaning and truth.  

The scripture I based it on, Matthew 6:26 says, "Look at the birds of the air.  They do not sow or reap or store away in barns and yet your heavenly Father feeds them.  Are you not much more valuable than they?"


I've been simplifying my design for the table this year.  I've taken on more responsibility with the event this year.  I know to maintain reasonable expectations for what I can do well, I need to step back and rethink my goals.  I've been planning my table for months so much work was already done. 

Here are a few photos of the design as I laid it out.  There's more to be added when it's set up but this is the basic idea.  I'm basing this table decor on Isaiah 40:8, "The grass withers and the flower fades but the word of our God will stand forever!"  I've loved having my mom here to work through the kinks in the plans.  I'll take more photos during the decor set up for the event.  Next week I hope to be able to share how it all comes together.


I've got so much to get done before the day is done!  I needed to make more business cards and that process was interrupted with printer problems.  My favorite tech helper happens to be my husband and I appreciated him running home to get the printer and computer talking again.  There's a presentation case and Yupo synthetic paper being shipped...I'm looking forward to getting rolling again with the paints and brushes.  My paint palettes are stored in the refrigerator until I can set up for painting.  I've got red poppies on my mind.  And cute white lambs in front of a red barn.  And cherry blossoms.  And sparrows on bare branches in the snow.  So much to be excited about...fitting it in at this time of year, we'll see how that goes.  Have a great December!  I'll be back soon.

Christy
-because she must make art.