Overview of Poppies Watercolors Series
The inspiration for these paintings began with a neighbor's garden! Lynn has one of the most green thumbs on our block. As I've shared before, I keep a close eye tuned to the gardens throughout our little town. Many a trip, toting one of my kids somewhere and back again, means I can spot the local views for inspiration. In the past, Lynn has been great with me taking photos of her sunflowers as well. I remember years ago...photos gone with a hard drive crash...taking some photos of magnolias she was growing in her living room. Last summer, I visited Lynn's garden when the early evening sun brought out their beautiful glow of oranges and yellows. The petals are like tissue paper, so delicate and thin. For my artist's eye, these are just too lovely to resist! I've looked forward to painting them and found they were worth the wait. There are a total of four paintings in this series. I'll be showing photographs from the stages of completion but not always from the same painting.
As I've shared in passing a photo on my phone of my current works in progress, many people have commented that poppies are their favorite as well. With photos sorted and favorites chosen, I began the process with the value sketches. The composition is very important in the planning stages. I must admit I broke some composition rules in two of these paintings. I did not place the focal poppy where it ought to be BUT I believe I was able to pull it off. This should not be my regular habit; the unusual composition appeals to me. My art critic husband is strongly drawn to the more traditional compositions.
I did not want to do the value studies/composition planning! Like brushing teeth...it doesn't take that long and it's painless, but it sure prevents future problems. I have been aware that these little quick sketches are important. I wanted to get right to the painting sooner. It wasn't torturous and I will begin implementing this in my process on a regular basis. It's really not THAT bad.
I have been making my sketches directly on tracing paper. Maybe I ought to be sketching on drawing paper in the sketch book first. What thought do you have? I suppose a sketchbook is a longer lasting record and easier to flip through later. Well, I made the sketches on tracing paper. I had purchased a thicker tracing paper and this was my chance to try it out. I think I prefer the thinner weight. Is it because it's what I am familiar with, that's undecided.
Sketches are transferred with graphite paper onto the 300 lb. watercolor paper. This saves the paper from multiple eraser marks and pencil lines indented in the paper. If you have not made your own graphite paper before, you should give it a try. You only need a few items and you most likely have them on hand now. Comment and let me know, I would do a how-to demo to show how it's done.
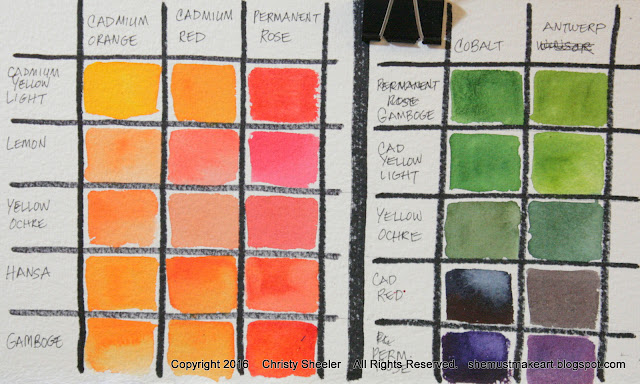
One of my other prep steps is the color mixing grid. This is my planning for what colors of pigment will work best for how I want this piece described. I plan for warm and cool warms, reds, and blues. I also keep in mind which ones are more transparent...so layers of color mix with one another. Which ones are more likely to stain and harder to scrub back out? That's also key information to remember! If for some reason, I would have to take a break from the painting for more than a few days, this is an important tool. Any type of visual reminder with color charts and notes are crucial! Otherwise, it will be an exercise in pure frustration.
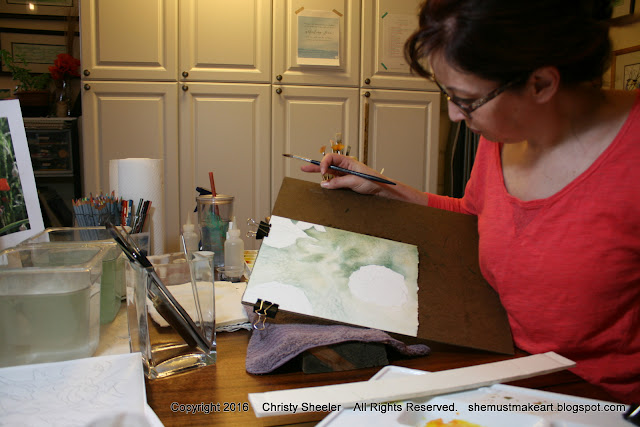
First washes are laid down for the backgrounds in soft green tones. With the new tripod and remote switch, I'm able to take more photos during the painting process. Such a lifesaver! I painted around the flower heads, careful to not paint over the petals. Once the areas around the flower heads had soft greens and golds, it was time to add a little variation. When the paper was completely dry, I painted in the leaves and stems with masking fluid. This keeps those areas protected from additional paint layers. The video I shared last week showed how masking fluid frees me to paint more spontaneously. It's great fun to lay in areas of bolder color. The masking fluid is removed later when I'm ready to add detail to the leaves,stems, and seed heads.
The YouTube video of my painting a background is available here. The photo shows my make-do method with foam board, tape and binder clips. The tablet adapter will make future videos more fun. I had a lot of fun (and some headache) making this short little video. If you're curious, it's a short little demo!
It's time to pay attention to the flower heads! They also take layers of color and this gives the finished piece more depth and richness. It's hard to achieve the same with just one solid application of color. Layering pigment mixes whether in the light or shadow takes thought to be consistent. There was quite a bit of scrubbing and lifting that took place in some areas. I just wasn't satisfied! Many a redo until I could be happy, letting the flower be complete.
Here's where working on multiple pieces at once is really an advantage. It's not really harder than working on a single piece until completion. If I were to tackle a much larger painting, I don't think multiples would work. This size, 8" x 10" is very manageable. When I feel like I can't work any further, say, to let it dry, I can pick up another painting and keep going. Picking up another painting to work for an hour, my view is fresh again. I see it with new eyes, noticing areas that need attention. The paintings all have the color scheme in common.
When I felt the paintings were ready for being done, I displayed them on the easel for a few days. While walking through the room, glancing at them will often help me see anything that I want to change. There's a fresh view again. An art critique from my husband helps...I can compare notes with his impressions and talk through any areas that bug me. So if nothing needs adjusting, it's time to flatten them. While I am working so wet during the painting process, even the 300 lb. paper will have a bit of buckling. A damp sponge on the back and a soft towel to protect the painting while it's weighed down with heavy thick art books does the trick. Twenty four hours later, flat watercolor paintings are ready to be signed! One of them had such a dark background, I had to use white watercolor paint add my signature. I liked it enough, I may begin signing with watercolor...although it's not permanent like the pen.
 |
| Poppies Single |
 |
| Poppies Sunlit Blooms |
 |
| Dancing Poppies |
 |
| Poppies Stand Tall |
The photography booth is set up once more! Now, I'm able to improve on this with the tripod, the remote switch, and better lighting. The new skills I'd learned last time were jotted down in notes. Cheat sheets found on Pinterest are printed off for more reference information. I seem to be learning something new everyday when it comes to the artistic process. I've had a great time photographing the artwork this round. A very successful photo shoot in the end! Photos are taken both for future Giclee prints but also for Etsy shop sales photos. I'm still in process of completing the Etsy photos for display.
The final photo shoot for display includes showing how the painting looks with a double mat. Other decorative views are so much fun to create! The collection of views is still not finished but here's what I can share with you now. A length of sheer curtain material makes a lovely backdrop, don't you think? In the next month, I will be giving more serious attention to preparing for ordering Giclee prints to sell. With special focus on quality of files submitted, I'll be sure that the fine art prints will be most pleasing. I've got to do my homework and do it right!


Next week, another studio update! I hope to have the next few paintings in the planning stages. Without knowing the week's unexpected life interruptions, my schedule is very flexible to adapt likewise. I'm waiting for Etsy to approve my application to sell Giclee prints in my ChristySheelerArtist Shop. At this point, my Etsy shop offers original watercolor paintings.
Thank you for stopping by today! I'm so happy to share how I work here in the art studio. Let me know if you've got any questions. I'd be glad to answer them.
- Christy
Facebook - My most frequent updates can be followed on Facebook, ChristySheeler-Artist.
Etsy - My Etsy Shop ChristySheelerArtist has a collection of my original works for sale. Soon the Poppies Watercolors will be listed there.
Pinterest - My Christy Sheeler Art Studio board is full of my artwork and links to all things related with my own personal work.


No comments:
Post a Comment