Let me begin by saying that not every artist does it this way.
Some use washes of pigment, adding in layers on top of layers...the previous one dry before another is added. Some artists change pigments as they paint, letting one color meld into another. It is such a fun sight, seeing the color mix right there on the paper. And some, like me, get caught up in the possible combinations (endless?) of mixing various pigments!
Every artist has their methods.
It's great experimentation to see the results on paper. Add to that, the ways the result can change by diluting with water, changing the proportions of pigments used, adding a third pigment.
Have I lost you already? I hope not!
Color mixing grids have become a key part of my preparations for painting watercolors. I usually have a firm vision in mind of where I'd like to go with an art reference photo. There are times when the vision is still fuzzy and the color mixing can help me make more decisions.
My mixing results do not have to match the photo. The photo is just a guide, a starting-off point...inspiration. It took me a long time to let go of the expectation to stick to the photo too closely. That may have been when my artistic style began growing in a really noticeable way.
Several years ago, my way of mixing pigment was more haphazard. It was a guess-and-by-golly method! I'd pick pigments out not really knowing much about their characteristics. Is it transparent or opaque? Transparent pigment will show the layers below it. This brings a luminescence. Is it more granular...resulting in a mottled effect? Is it strongly staining? Lifting and scrubbing later, there would still remain a hint of that pigment.
Why Go To All This Trouble?
1. Useful Guide For Future Artworks
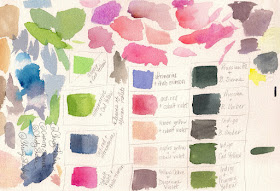
So here's an example of my earlier color mixing "notes" from previous paintings. They give me very little information about how I got those sample bits of color. I may look back now and love something I see there, but without any written guide, it would be hard to duplicate now.
2. Real Life Interruptions
Just when I'm on a roll, the paint is flowing well and I'm feeling the inspiration... That's about the same time when I'm called away to do something unrelated. Whatever it is, it means I need to switch gears; I must leave the current painting for now. Who knows how long "for now" will really be? I get up and leave my art table. I think I'll be back in less than an hour. That can easily turn into a week or more! (I've learned to cover the palette as a safeguard.) I know firsthand that it's a frustrating experience to come back to it again. The rhythm I had going has been stunted and I'm not sure how to get going again. The colors used and mixed is a really big deal. Actual written notes and color mixing guides are so important! Without them, I'd rather scrap the painting and begin something else. That's more easily said than done.
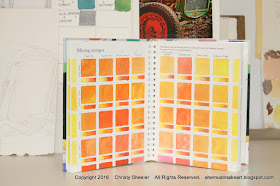
Here are a few of my more recent color mixing grids:
On the grid for the Crocus series, you'll notice the bottom edge of the first 5 rows are lighter in each small square. Why? I waited until the paint had dried and then I scrubbed with a damp paintbrush. I wanted to see which mixes would lift easily. It's very useful to know which mixes will stain the paper.
3. A Warm-Up For Creative Thinking Muscles
It's a little scary to place the first brushstrokes of color on paper. Many artists will paint a diluted, pale wash of yellow ochre or raw sienna across the entire paper to get rid of all that white. This exercise in color mixing is quite enjoyable; the anticipation builds. The frame of mind shifts to focusing on what to express with color.
The following show how I've been working in the studio to prepare for upcoming watercolor paintings:
The color mixing grid begins with an outline. Sharpie fine-point permanent ink grid and labels keep it easy to read. I place a row 7 dots of dioxanine violet pigment across the palette. That first step saves paint and needing to rinse the brush more often. Next, I begin with mixing about the same amount of rose dore into the first dot on the palette. This color mixture is painted onto the first square. I rinse my brush and move on to permanent rose. Once I've mixed near-same amounts on the palette, I paint that new mix into the second box. And so on...
The palette above shows the mixes that were added to the color grid bottom left corner. It's a really enjoyable activity! The range of options are limitless!
I have mentioned this before but I'll say it again... My go-to reference that I refer to often is The Watercolor Painter's Pocket Palette by Moira Clinch. It's a fantastic tool for guiding in a lot of useful ways. I have other books with palette and pigment suggestions that I enjoy as well. This one is my favorite for the amount of information and its compact size. Other helpful books are not as easy to slip into a weekend travel art bag.
How are these being used in the studio now?
I've been working on the preparation stages for three watercolor paintings. I'm not quite sure which one I'll choose to begin first. I'll be moving away from a series this time. The cherry blossoms are pulling me in the direction where I'm most comfortable. That sketch still needs to be transferred to watercolor paper.
The vintage, the Diamond-T truck (back row, right) is faded and rusty with very little of the original paint showing...and it's my husband's vote.
The green vintage tractor (front row) has a lot of character and the perspective is fantastic to my eye. It is all drawn and transferred to watercolor paper; of the three choices, it is most ready to begin.
In order to have them all going at once, I'd need to have several palettes. The only other way to do this would be using disposable mixing cups. My first choice is to work on them one at a time. I've taken notes on the Diamond-T truck and should probably do the same with the others.
So, what do you think? Have you ever tried anything like this? If you'd like to learn how, let me know. I'm glad to share more.
In the meantime, I should have an update on the watercolor painting soon to be in progress!
Stay tuned!!!
Christy


Amazing tips. I appreciate the detail you put into this discussion. Gave me some great ideas.
ReplyDeleteThanks, Nicole! Have you tried something like this before? Are you a fellow watercolor-addict? I appreciate the comments!
DeleteWell, it’s a nice one, I have been looking for. Thanks for sharing such informative stuff.
ReplyDeletecolorful paint by numbers
I impressed by the quality of information on this website. There are a lot of good resources here. I am sure I will visit this place again soon.
ReplyDeletechristmas paint by numbers
I am very enjoyed for this blog. Its an informative topic. It help me very much to solve some problems. Its opportunity are so fantastic and working style so speedy. I think it may be help all of you. Thanks.
ReplyDeleteart sets for adults