Saturday, April 30, 2016

Dancing Poppies Watercolor Painting

I meant to highlight each of the poppies watercolor paintings.  In the series of four paintings completed together, I shared each in a post of its own.  All except this one.

It's really no wonder; I've felt a bit scattered and disorganized lately.  My success in managing so many aspects of the art process varies with life's seasons.  I'm still learning how to keep it all together between artistic pursuits and family needs.

Bear with me, I'm finding the rhythm.  Maybe like learning a complicated dance step?


I would like to present Dancing Poppies, the completed watercolor painting!  It was completed in late February 2016.  The original watercolor painting is available on Etsy in my Christy Sheeler Artist shop.  (This post added April 2016.)  

Along the way, as the blog develops, I'm enjoying being able to share behind-the-scenes views of the process, like a virtual studio tour!  Hey, I'm so glad you had time to drop in today... Can I offer you something to drink, iced coffee, water, green tea?  Let's get started, it's just so fun to have friends stop by with eagerness to see the art studio.


Sketch It Out 


So this painting began as a simple value sketch with Sharpie fine point black marker.  You can see there's a vague and loose feel to the sketches.  Using a black and white print of the photographs helps me see the range of values from lightest to darkest areas.  This is not a regular habit of mine and I'm still deciding whether I'll use it on a regular basis.  I've got a feeling I'm already doing this subconsciously in my planning process.  The composition of this piece is not one that follows the traditional rules.  Without realizing it, I have a composition that breaks rules.


value studies sketches for poppies watercolor series


A Photograph for Reference


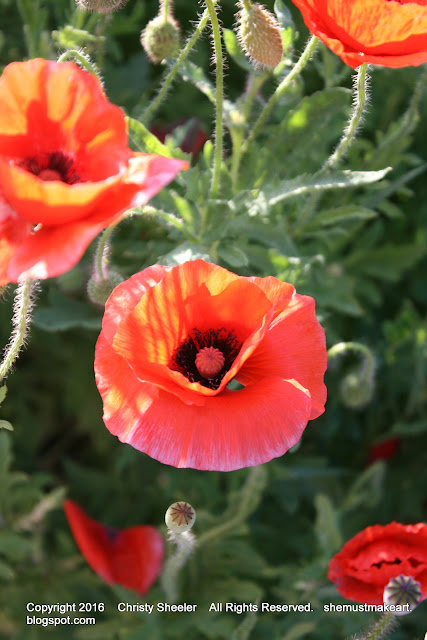
The photo reference I used for this piece with one change:  the flower at the left is reversed and placed at the far right.  This was a bit of a challenge when it came time to paint it with the light coming from the top left.  The light striking the petals needs to be consistent for all the flowers.  Mind bending?  Yes.  I still do it to myself anyway.


Dancing Poppies art reference photo by Christy Sheeler 2016


Tracing Paper Has The Details


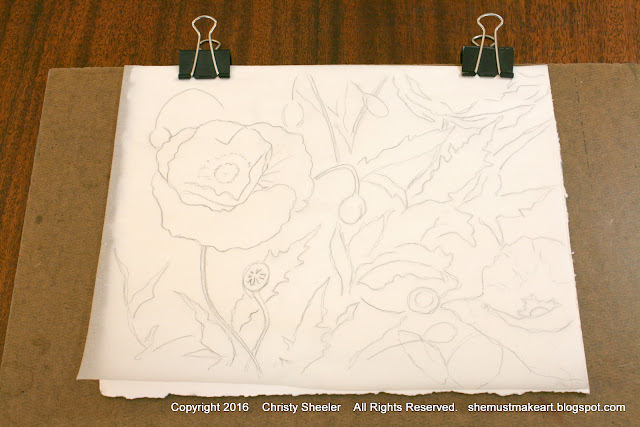
Tracing paper has become my favorite for sketching.  It's easy to draw in a detailed way and erasing is effortless.  Now, with the sketch for Dancing Poppies, clipped to the board, I can transfer it to the watercolor paper with a sheet of carbon transfer paper sandwiched between the layers.


Poppies sketch on tracing paper.  Dancing Poppies watercolor painting planning stages.


Let the Watercolor Do Its Thing


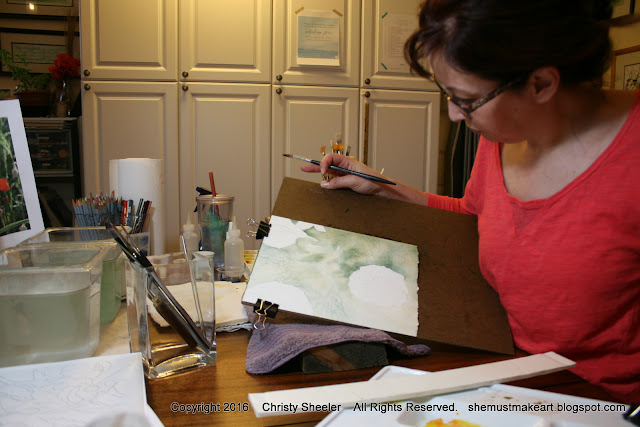
The first washes of watercolor pigment are soft and loose.  I begin with the background for this piece.  Where I begin varies with each painting.  There are some that begin with the main subject.  Here, I had such joy in working on wet paper, allowing the pigment to flow where it pleased.  When I am concerned about pigment moving into delicate petal areas, I apply masking fluid while the paper is dry.  I applied masking fluid in stages so that stems and leaves had a soft wash of the background as their base color.  It's much easier to be free and spontaneous when I don't have to work carefully around details.


A photograph of beginning the watercolor background for Dancing Poppies.


In the background, the other three watercolor paintings in the poppies series are resting on the easel.  I have them there to study at a glance.  If there are problems, I'll usually notice them in passing more than while painting on them for an extending period of time.  There will be a final critique session with that great husband critic at the end.  Dancing Poppies, on the studio table, has a background that's building with layers of watercolor pigments.  It's even taken on a golden tone in the upper left area of the painting.


watercolor poppies series in progress


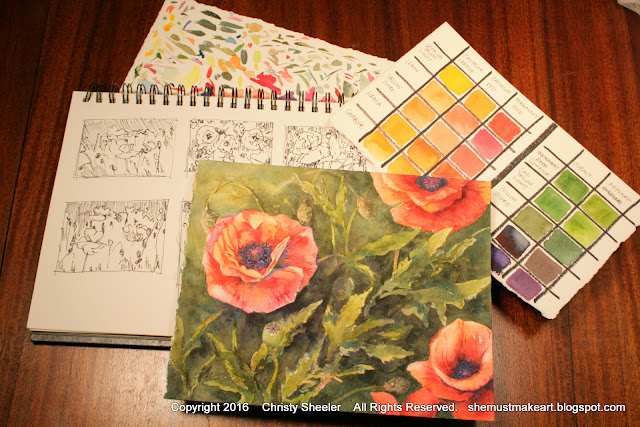
For some reason, I was so busy in the throes of creativity, there are no photos of this piece while the petals were being painted.  Sometimes, it happens like that.  I get a spurt of crazy get-this-going energy and there's no stopping until it's done.  So the completed Dancing Poppies with the tools used along the way.  The value studies, the sample brushstrokes of color, and the color mixing grid all help me through the process to the finish.


Dancing Poppies completed view with reference tools.


A shot of the studio table while work is going on shows my typical set up.  Occasional time-outs are called for some clean up.  It seems that in the flurry of paintbrushes and pigment, things get cluttered and out of sorts.  At the end of the day, I'll bring it all back to tidy again so it won't be an intimidating sight the next morning. 


Dancing Poppies watercolor painting completed viewed on studio table.


The Finished Painting


Dancing Poppies, the rule breaker for composition design.  The sunlit leaves weaving their way through at an angle seem to help it work...at least in my mind's eye.
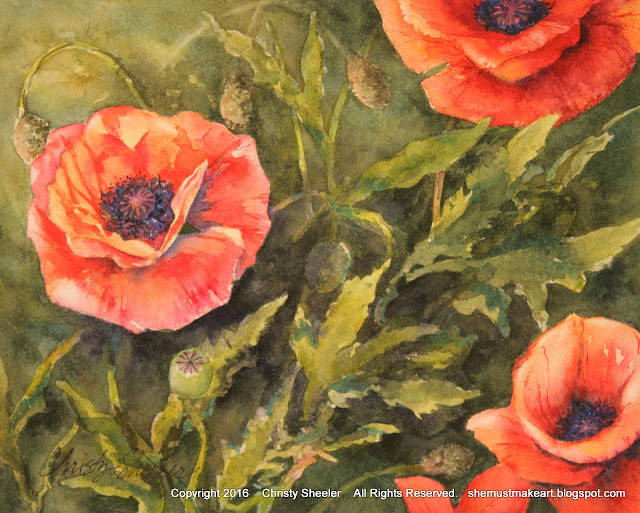
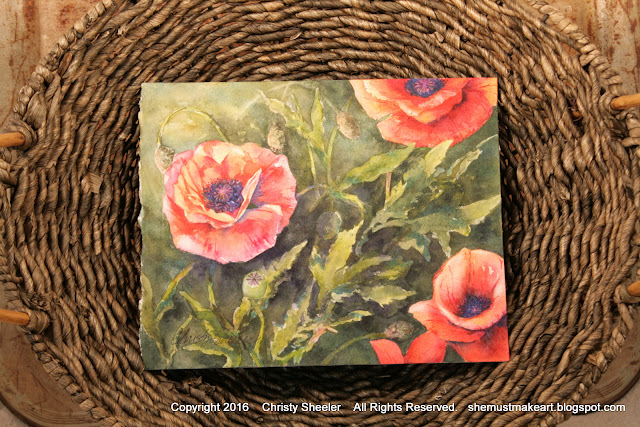

Dancing Poppies Watercolor Painting


Dancing Poppies Watercolor Painting in decorative display


 Dancing Poppies by Christy Sheeler 2016


Well, I feel better knowing that Dancing Poppies got its own reveal.  Maybe no one will ever know the difference...but if you're here reading this, it did make a difference!

So what do you think of composition?  Do you like the more traditional or the unusual view better?  Maybe you've never really thought about it before.  This week, here's a challenge:  keep your eye on the look out for art that you enjoy most.  Look for the way the main parts are arranged.  Do you think it's traditional or not?

-Christy
she must make art.


P.S.  To see the blog post about the full process of all four poppies watercolor paintings in this series, click:  Watercolor Poppies Complete Art Process.


Thursday, April 28, 2016

The Vintage Tractor in Watercolor

a virtual studio tour the vintage tractor Christy Sheeler artist 2016

Virtual Studio Tour!

It's taken a while now but I'm happy to reveal
The Vintage Tractor watercolor painting.  After so many landscape and floral subjects, it's been a treat to take some time with the faded paint, dents, and rust!

More than ten years since my last mechanical type subject...
So many years, I'll have to check with my car-guy husband to know for sure which one was most recent before this one.


As I've shared often, I love the hunt for all variety of items from a time gone by.  It's like these items have a story to tell.  They tell about the culture and the daily living of that time.  When I saw this old tractor sitting out in the elements, it seemed to have character all its own.  Only later did my husband explain to me that it was pieced together with some real ingenuity.  Automobile parts were used by the skilled hands that put this tractor together.  He tells me how someone who knows cars will recognize the unconventional parts used for making it a tractor.  My untrained eye did not see that.  There was just something unusual and interesting about it...that's all I could figure when I chose this as an art reference.

Have you ever seen a completed project and wondered, "how did they do that?"  With artwork, I believe that happens so I enjoy sharing the behind-the-scenes progression of artwork.  Well, here goes!

Thursday, April 21, 2016

Palettes at Every Turn


With the arrival of spring, I'm thinking ahead to summer.  Summer in Montana and weekends in the mountains mean packing an art supply bag.  For so many years, I've been faithful to pack the supplies and hauled them with me as we traveled.  I've not spent very much time using them.  We are so busy, not taking much time to stay in any one spot for long.  There were times I made an attempt to paint for that brief 15-20 minutes.  Then it's time to pack it all up and get on with another activity.  Those camping trips were full of activity with young kiddos.  We took them hiking at 4 and 5 years old, their hooded jackets tied at their waists and a little water bottle of their own.  They loved it from the very start.  We'd stop to dip our toes in the lake or stream, such icy cold water.


Several cameras have been taken along to record it all.  I've been watching for the art reference photos and the priceless family memories at the same time.  Now, they're teens and needing to take their own photos.  Whether it's on a cell phone, tablet, iPod, or an actual camera...we are all taking our share of photos.

My fingers are itching to start packing it all up again!


Last summer's art supply bag and gear.

Here a palette, there a palette, everywhere a palette!


One of the key items I'll pack in the art supply bag is a watercolor paint palette.  I was thinking about purchasing yet another new palette for travel when I realized I have plenty of palettes.  Digging through cupboards, I gathered them all up.  I chose three to clean up, removing old dried paint, and they are like new again!  I found my travel palettes and am considering using them this year.  They are stocked with plenty of watercolor pigment.  One needs to have the mixing area cleaned.   For some reason that I cannot describe, I am not comfortable using them.  Maybe it's just because I haven't had a lot of time using watercolors while we are away from home.  It's an awkward, unfamiliar experience.  I always long for my big palette.

Travel Palettes


The Rembrandt travel palette is a mix of luxury and space-saver.  It's petite paint pans and travel paintbrush are tucked in a sturdy case.  The navy blue velvet bag just tops it off!  I've used it a bit as you can see.  This was a pricey little bundle, purchased before children...  I'm looking forward to having the time to break it in soon.


The metal travel pan came empty and I filled it with the pigments years ago.  It has a thumb hole and is easy to position on my forearm.  In the past, I have not painted while standing but it would be a great habit to start.  I'm not sure I'd still choose the same pigments.  I've got a better understanding of pigments now.  When I filled this, I selected pigments on a whim.  Adventurous and spontaneous, I didn't conform to the all the standards recommended.  There are several in the metal palette I might not select this time around.


The plastic palette was another attempt to find a way to be comfortable painting in nature.  It's got more room for pigments than the Rembrandt and takes up less space than the metal case.  This one has a thumb hole.  It also has smaller holes to hold paintbrushes.  Here again, I'm not so confident about my pigment choices but I think it would be a fun challenge to make them work!


Studio Palettes


So, take a look at my usual "Old Faithful" palette.  It is the oldest one I own and has been well used and abused.  It's had cracks repaired with hot-glue seams.  It mixing area is still a mess!  All those areas of mixed pigment...instrumental in completing many paintings!


Now here's a look at the one that replaced it and you'll see a lot of similarity.  This style of palette is my go-to standard routine for painting with watercolors.  With large wells, plenty of pigment means less interruptions with making refills.  The center mixing areas are roomy and the lid doubles as another mixing area.  Labels for the pigment wells make the mixing easier.  Whether labeled with a permanent marker or a label maker, it's worth the time.


Yet More Palettes

Some palettes I use for more pigment that won't fit on my main palette.  You're probably thinking this just sounds crazy.  It's really not that crazy at all!  There are core pigments needed for the best mixing results.  There are other pigments that aren't needed very often.  They are needed in select paintings, depending on the color scheme.  The pigment names are written on with a fine-point Sharpie marker.  When it's time to clean off the writing, a magic eraser does the trick!


In the past several months, I've changed my method for single pigments that are used less often.  Small plastic cups with lids are perfect for keeping pigment.  The name of the pigment is written on the lid with permanent marker.  My work table is crowded enough most of the time.  These little cups save me from needing to make room for another palette.


The other three palettes are clean and white!  The enamel butcher's tray has a lid.  It works best for mixing up a large puddle of watercolor pigment.  The two plastic trays have plenty of areas for mixing while keeping mixed pigments separate.  I think taking one of them for travel would be perfect; the mixing areas in the travel palette is extremely limited.


I may not have convinced you it's necessary to have this number of watercolor palettes.  Or have I?  Aren't they wonderful?  Just to me?  Aren't you at least a little tempted to purchase yourself a travel watercolor kit?  They are such a treat!  I'm sure there must be some way to pack a small bag of art supplies.  I haven't been able to manage a small bag in a long time.  How do I choose what to leave behind?  I'll compile a basic list of items to take for art in nature and share in the next few weeks.

If for some crazy reason, you're been searching for a watercolor palette like one of these... just ask me for more information.  It's been a long day so I'm not going to be super descriptive with specific brands and links.  You want any of that, just comment and I'm glad to help!

Thanks for letting me show & tell today with the palettes...
let me know what you're curious about related to watercolor art!

-Christy

she must make art.


Thursday, April 14, 2016

Sketching Subjects with Mechanical Details


Sketching Subjects with mechanical details, sketching before the painting happens, artist process, drawing for proportions, using grids to sketch


The Beginning of The Vintage Tractor in Watercolor


My subject matter for the current watercolor painting is different than recent paintings.  The vintage tractor has sun-faded paint,  rust, dents, and wonderful textures!  Add all that color and it's practically begging me to put it on paper.  It's a big change, not quite the same as a landscape or flowers.  While the flower has its own tiny details to conquer, there is more wiggle room for the artist.  If the petal moves a little to the left, it's just fine.  If the stem is a little longer, no problem.   I can always add a few more leaves.  Well, I'm not giving myself an easy challenge here but I still can't resist.  That -and my husband is really, really excited about watching this one come together.  

What about subjects with more mechanics, pieces and parts?  You see, if it's a subject matter that others know well and proportions are off, there's a problem.  This is something I've faced before with subject matter like vintage automobiles.  Now, the current watercolor painting in progress, a vintage tractor is the same.  The sketch used is the foundation of the painting.  Careful planning is necessary for the sketch to be completed.  Are you curious about how that drawing begins?

How does an artist plan out the detailed sketch?  

Are there tricks that help make it more successful?  


That's what I'd like to share today!

First, I'll show the original photograph, where this all began.  On a Saturday morning, my husband and I were checking out all the great finds available at Timeless Tom's.  We both enjoy the hunt for something we must have...it doesn't matter that we weren't really looking for it.  I've got a love of searching through all the variety of items he brings from farm and estate auctions.  The tractor didn't come home with us.  With my camera, I was able to snap a few photos of this one-of-a-kind homemade tractor.


Vintage tractor photograph, art reference, repurposed automobile parts


Once the photo is imported into photo editing software, I can make any needed changes for using it as an art reference photo.  That might include cropping, adjusting the fill light and highlights, and increasing the color saturation.  I save that version.  Then, I create a version with some more noticeable filters applied.  This version has more artistic license.  It's my rough draft guide to where my creative juices want to take it in the final painting.  Let me say, if you really like that version, I could order the photograph as a print on fine art papers or canvas.  Let me know.  We'll talk.


Edited photograph vintage tractor, filters applied.  Second art reference photo used for artwork.


I have my reference photos printed online or at a local photo kiosk.  For this project, I have a printed copy of the second version with the editing done.  These tips can be followed with photos displayed on a tablet as well.

Thursday, April 7, 2016

More (my) Perspective Matters: Where to Start


river, stream, rocks, sunlight dancing on water, shoes of photographer


In my previous post, (my) Perspective Matters, I shared that I struggle with what attracts my attention.  My focus can change quickly and I need to protect my positive mindset for better results in the art studio...and in every area of life.  I have been able to list ten tips for making this happen.  How do I go about being in a great frame of mind for creating art?  It's not easy.  I fight myself with great avoidance tactics.  So remember, I'm not saying I've got it all under control.  Further down in the post, I've had a little fun with cropping my artworks for an unusual perspective.  You can compare with the larger view of the same artwork.  I hope you'll find a new idea or rethink how you can adjust methods that are already familiar.  Please, give me suggestions of your own by commenting; we can all use more ideas to make this work better.


1.  Limit exposure to the news.
It's important to be aware of what's going on in the world around us.  It's too easy to be pulled in deeper and get depressed over events out of my control.  News can quickly bring me down...


2.  Screen my feed on Facebook.
...and other social media.  Filter out who is just one negative share after another.  The food we eat is important; what we allow in through our other senses is the just as important.


3.  Spend time in the Bible.
Take it or leave it, based on your own decision.  How do you take time to refocus?  How are you able to regroup and refresh your mind?  This is my own discipline; I try to stick to it on a regular basis.  For me, it forms a better framework for sifting through the rest of the day.  Ten minutes can change the day for the better!


4.  Choose music playlists carefully.
What am I listening to throughout my day?  Music influences are a biggie for me!  Maybe you prefer quiet.  Stick with what works best for you.  Be aware of it so you can make it your routine.  I am moved and inspired by music.  I switch styles and stations often but I still need them to affect me in a positive way.  George Winston is a great instrumental/piano choice.  Brian Crain is another great choice for instrumental/piano.  Pandora has plenty to choose from with nature sounds incorporated as well.  The type of music is chosen by how seriously I am focusing...at times I just need something instrumental so I'm not distracted by lyrics.


Wednesday, April 6, 2016

More spring photography from Instagram!

When a subject from nature interests me, I take the opportunity to take as many photographs as possible.  Building my photography collection for art references is a serious effort.  I'm sure I've mentioned this before but it's crazy true.  My obsession with attention to detail, watching for a perspective or angle that I can't pass up is always there.  In the past few days, I've checked on the cherry blossoms often and taken perhaps 200 photos...some turn out and some don't, so I go a bit overboard to allow for mess ups.  I've been experimenting with the backgrounds being less distracting and more blurred.  I'm also learning that the tripod needs to go along and be put to good use!  New habits 101...


I'm excited to share a few more photos from our afternoon drive in the Lewis and Clark National Forest.  We just say, "let's take a drive up the Teton."  The fresh, clean air and big, blue sky combined with the scent of pine is just a rejuvenating way to escape regular life stuff for a while.


See you tomorrow!  I'm preparing to share some useful tips on keeping a better perspective, a continuation of the topic from last week.

-Christy

Tuesday, April 5, 2016

Spring at Higher Elevation in Montana

Spring means crocus on the foothills of the mountains here on the east side of the Rocky Mountains.  A Sunday afternoon drive includes a packed picnic of hot dogs, potato chips, and store bought cookies.  Hmmm...and a 2 lb. bag of Sour Patch Kids candies.  No, we didn't finish it.  It was a nice unexpected treat that made the ride more fun.  The late-afternoon sun danced through the trees and off the icy water running downstream.  I would have stayed for a week, given the option!  Thinking now on how to pack the summer art bag...is lighter possible?

I'll add another photo tomorrow.

-Christy


A photo posted by Christy Sheeler (@christysheeler.artist) on